Easy-to-follow tips for guitar chord progressions: a beginner's guide RSS

Getting started on the guitar
For many players, one of the first things they learn after the parts of the guitar and the string names are the first couple of open position chords. Which chords those are will likely vary by instructor, but that is usually where they get started. Ideally, they will learn chords that can go together forming basic progressions. It might be a bit much to go over all of the basic theory in this lesson, but it is definitely a good idea to do some homework on the subject and get to know why certain chords follow or precede other chords. For the purposes of this lesson, I will provide you with several chords in the keys of C and G to get you started. Then, I will provide you with several common chord progressions and variations and discuss how you can move them around to create your own music.
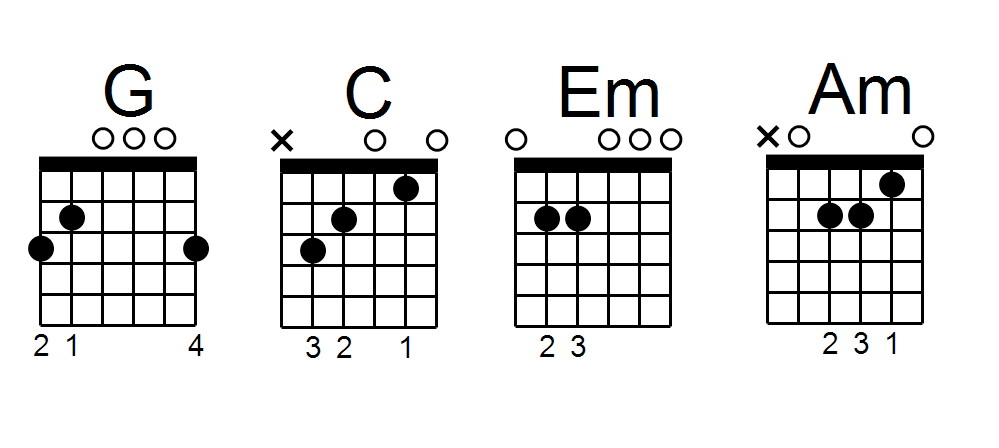
Open position chords are chords that mainly use the open strings and the first three frets of the guitar. As mentioned, these tend to be the first couple of chords that most beginners learn. These chords are suitable for the keys of C and G:
Make a good sound

Before moving on to actual progressions, I feel we should discuss for a moment how to get the best sound out of these chords. When holding the neck, it is important to hold the guitar as if you were holding your tennis ball. You should mostly be fretting with the tips of your fingers without bending the DIP joint (joint closest to your fingertip). It is normal to get some muted strings at the beginning. Unfortunately, there is no way to remedy this other than good old-fashioned practice. Don’t get frustrated, it will come with time.
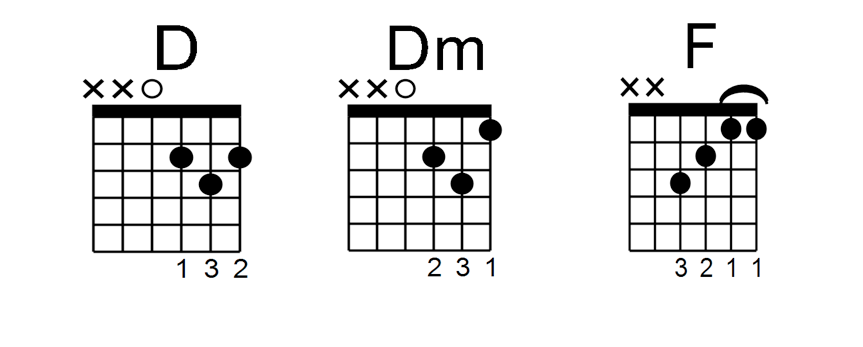
Moving on, once you feel comfortable with these chords, it might be a good idea to add the next few, then you can really get cookin’. (Please note: F major is not technically an open position shape, but it is close enough to that part of the fretboard that we can list it with the rest of them.)
Chord progressions
It is beyond the scope of this lesson to explain how the progressions are built and each chord’s function within a given key, but I strongly encourage you to refer to the link listed at the top of this page for some great information. I will, however, give you a few basic ones that you can use to play around and possibly come up with your own variations.
- C Am Dm G
- G Em Am D
- C G Am F
- G D Em C
You have probably heard these progressions once or a thousand times before. That is because they are used in literally thousands of songs, and that is ok. You see, you can only do so much with progressions, but you have an endless array of possibilities when combining it with melody, rhythm, texture, and orchestration.
Here they are, in order, for you to listen to:

How to practise
Let’s go ahead and discuss the process of practising these. It is very important to make sure you get each transition right. Make it a point to take each transition and isolate it. In other words, practise these in pairs of chords. For example, C - Am /// Am - Dm /// Dm - G and so on. Once you feel you have each individual transition down, then maybe it is time to attempt the entire progression. With regard to time, remember, it is more important to take it slowly - very slowly if necessary - and get it sounding right than to try to rush through it. Practise with your metronome. If you are bored or feel you have overcome a given tempo, bring it up to about 80 BPM and try that. I would recommend that you do not proceed to the next speed until you can play through the progression at least four times without messing up. Practising slowly reinforces the proper movement of each transition in your brain so that when you increase the tempo, you will still use proper technique. Rushing through it only reinforces bad technique and bad tone. I am sure you don’t want that!
Playing around
Once you feel comfortable with these progressions, I invite you to play around with the given chords and come up with progressions that sound good to you. To this day, the most fun I have ever had in music was coming up with my own stuff. I am sure many other players would agree. Further, if you can get your hands on a capo, you can move these shapes and progressions around the neck. Say, for example, that you have come up with a nice melody over a particular chord progression, but you don’t really feel comfortable in that range, you can move the capo around and try different keys until you feel comfortable.

What next?
When all of this gets boring for you - and it will - I invite you to begin learning songs from other bands and musicians. There is no better tool for learning than learning from your favourite players! When you learn from other musicians, you will learn new chords, new ways to play them, new progressions, and overall new approaches. It is important to maintain a good practice plan and be disciplined about it. I am sure my students would say that I sound like a broken record, but a little bit each day is better than skipping a whole week and cramming one day. Routine is of the utmost importance and it is the only way to really absorb the material.
About the Author
Marc-Andre Seguin is the webmaster, “brains behind” and teacher on JazzGuitarLessons.net, the #1 online resource for learning how to play jazz guitar. He draws from his experience both as a professional jazz guitarist and professional jazz teacher to help thousands of people from all around the world learn the craft of jazz guitar.
Guitar not your thing?
If you’re starting piano instead, try our NEW E-MusicMaestro Learn to Sight Read books for piano! Available online and from all good music sellers.